If you run a server on AWS, you may be unpleasantly surprised to discover you don’t have the option to automatically resize between all instance types. I decided to resize m3 to t2 instance types (m3.large => t2.small) when my reserved instance lease expired & my needs had changed from those of running a commercial web business to running a small blog.
Turns out, AWS has made numerous network and architecture changes since my machine image was created in 2014. What should have been a small change turned into quite a bit of work. I’ve summarized the steps below should you encounter the same issue.
EC2 instances built today (called EC2-VPC) do not work interchangeably with older generation (now called EC2-Classic) instances. Here are some key differences I encountered:
Key Differences between M3 and T2
| m3.large | t2.small |
|---|---|
| Ubuntu 12 | Ubuntu 14 |
| EC2 Classic | EC2-VPC |
| Apache 2.2* | Apache 2.4* |
| (Classic) Security groups | (VPC) Security groups – have to clone from Classic |
| Elastic IP | VPC Elastic IP – new IPs required |
| RDS security group can map directly to EC2 security group | RDS security group needs CIDR/IP-based rule (security groups no longer work) |
Resize M3 to T2: Migrating data
After some trial and error, here’s how I manually migrated my data from M3.large to T2.small, downgrading my instance type while upgrading some software.
1. Made a backup AMI of my production (m3.large) instance. This creates a corresponding new snapshot.
In Console > EC2 > Instances >
- select original server (m3.large)
- right click > Image > Create Image
2. Created new t2.small instance on AWS with Ubuntu14 (since Ubuntu 12 no longer available)
In Console > EC2 > Launch Instance >
- select Ubuntu 14 SSD (64bit) AMI (called “Ubuntu Server 14.04 LTS (HVM), SSD Volume Type”)
- select t2.small
- click Next: configure instance details
Network: Note that new instances will launch into a default VPC, even if you didn’t use one before. - Next: add storage
I selected General SSD for compatilbity with my AMI, may as well upgrade everything to current generation specs. - Next: Tag Instance
- Next: Configure Security Group
Note you’ll have to clone your EC2 security group into a new VPC security group.
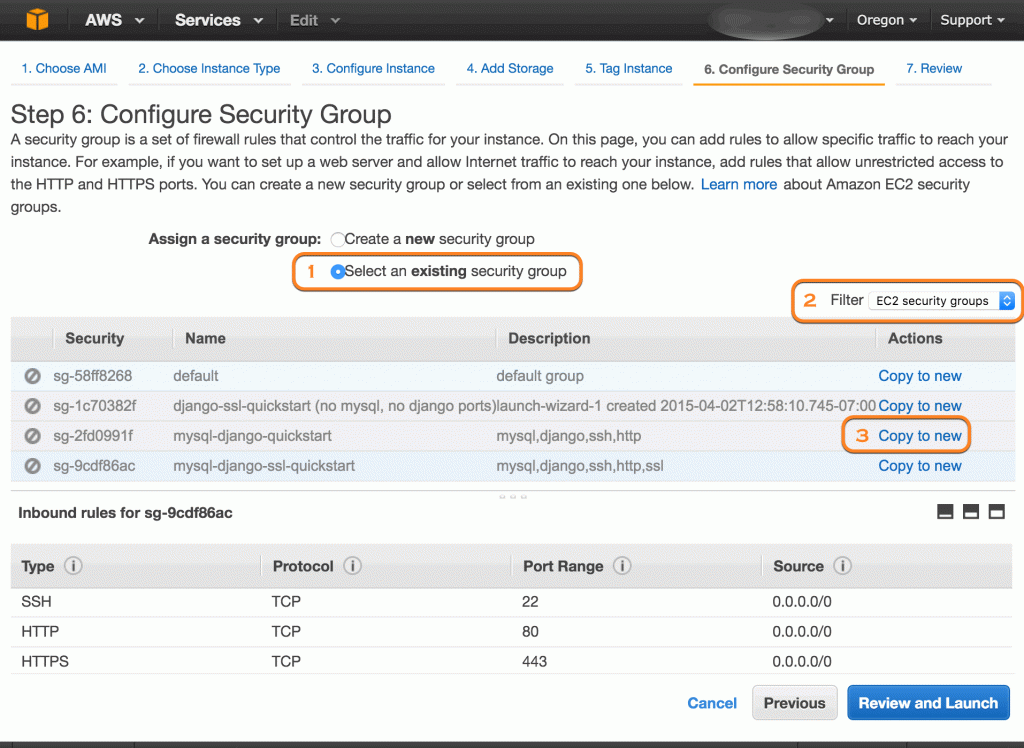 click image for larger view
Follow the steps pictured.- Click Select an existing security group radio button
- In filter dropdown, select EC2 security groups
- Next to the desired security group, click Copy to New
- Give cloned group a name (can be the same as EC2 name – but will now live in the VPC security group list.)
- click Review and Launch
- Launch
- Select an existing key pair
- Launch Instance
3. Purchased t2.small reserved instance for cost savings (in EC2 > Reserved Instances). I like Partial Upfront payment.
[skip this if you don’t use reserved instances]
4. Created a new SSD volume containing my production data.
EC2 > Snapshots >
- Select snapshot created in step 1 (from the m3.large server)
- Right click > Create Volume
- Volume Type: SSD (aimed for parity with the new t2 instance & AMI)
- click Create
5. Attached new SSD volume to new t2.small server.
a. Stopped t2.small server
- EC2 > Instance >
- select t2.small instance
- Right click > Instance State > Stop
b. Attached new SSD volume to my t2.small instance
- EC2 > Volumes >
- select new SSD volume created in step 4
- Right click > Attach Volume
- select new t2.small instance
- Attach
Note: Attempting to attach the m3-cloned volume as the root volume on the new t2 instance will not work because of Ubuntu OS changes. The attach step will succeed, but the instance will not start.
c. Started the instance.
- EC2 > Instances >
- select t2.small instance
- Right click > Instance State > Start
- Copied the Public IP of this instance into my clipboard from the Description tab in the Console.
d. Mounted the new volume
In Terminal:
ssh -i myprivkey.pem myuser@[paste_copied_ip_here]
Verify you see the new volume
> lsblk
> sudo file -s /dev/xvdf #will show disk details
/dev/xvdf: Linux rev 1.0 ext4 filesystem data, UUID=66ee2d17-8422-46ad-a618-c4dd4852ed46, volume name "cloudimg-rootfs" (needs journal recovery) (extents) (large files) (huge files)
Mount the new volume as /origprod
> sudo mount /dev/xvdf /origprod
> lsblk
NAME MAJ:MIN RM SIZE RO TYPE MOUNTPOINT
xvda 202:0 0 15G 0 disk
└─xvda1 202:1 0 15G 0 part /
xvdf 202:80 0 20G 0 disk /origprod
Elastic IP changes
If using Elastic IP, you must create new VPC-friendly Elastic IPs to use with EC2-VPC Instances, like the t2.small. You cannot associate existing, older generation Elastic IPs with new EC2-VPC Instances. Bummer.
To create a new Elastic IP:
- AWS Console > VPC > Elastic IPs:
- Allocate New Address
- Actions > Associate Address > assign to your new instance
Route 53 changes
If you are using Route 53 for your DNS, you will need to update any A and CNAME records in Route 53 to point to your new instance’s public IP. Find the “Public IP” by selecting your new instance in the AWS Console.
If you are using Elastic IP, the Public & Elastic IPs will be identical.
RDS changes
If using RDS, you can still connect to non-VPC RDS instances from your new EC2-VPC server instances. However, the access controls have changed.
While you used to be able to enable RDS access by EC2 security group (which meant any server instance deployed with this security group was granted access to reach the RDS database), this no longer works. Now you must use the VPC server’s IP (or IP range).
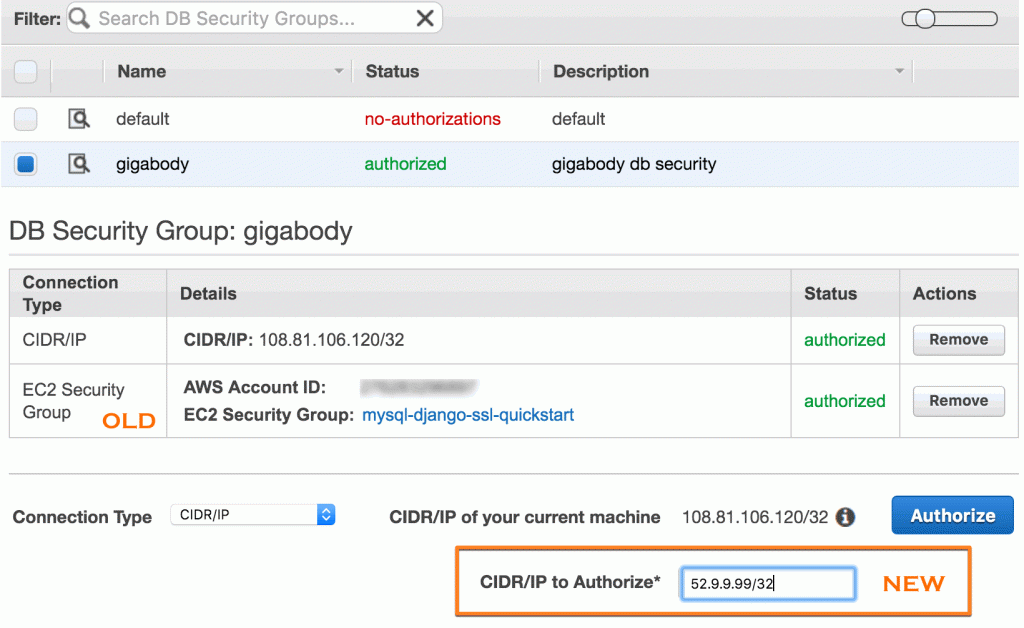
To enable RDS access from an EC2-VPC instance:
- Console > RDS > Security Groups
- select your authorized security group
- add a new rule with your public IP/32 (or a VPC IP range you are using)
For example, if your new instance’s public IP is 52.9.99.99, add a CIDR/IP for 52.9.99.99/32 - Click Authorize
 click image for larger view
Fix sudo warning on new EC2-VPC instance
Finally, if you see an error when you use sudo, such as
sudo: unable to resolve host ip-177-30-0-63
Here’s the fix. Do this *after* setting up your elastic IP if you’re using one.
#get your hostname
> hostname
ip-177-30-0-63

# add it into your hosts file
sudo vi /etc/hosts

# add this line under the '127.0.0.1 localhost' line pointing to your new hostname
127.0.0.1 ip-177-30-0-63
Next steps after migration from m3.large to t2.small (from Ubuntu 12 to Ubuntu 14)
Now you can migrate data easily from your attached volume to your new volume to reproduce the original filesystem structure. At a minimum, you will need to:
- copy data from the newly attached volume to the main partition
- install updated software packages for Ubuntu 14
- recreate any custom permissions and cron jobs
- set up configurations and services
- check for compatibility with your application code
Some changes will be required.
Apache changes upgrading from 2.2.* to 2.4.*
Here are Apache upgrade issues I encountered.
1. Custom conf files that used to get loaded from:
/etc/apache2/conf.d/
Now live in
/etc/apache2/conf-enabled/
2. Modules you expect to be loaded won’t be yet, but you can enable them with commands like:
sudo a2enmod headers
sudo a2enmod ssl
sudo a2enmod expires
sudo a2enmod rewrite
3. The default DocumentRoot may have changed. You can update the location, in the default config file which has also changed names from 000-default to 000-default.conf:
sudo vi /etc/apache2/sites-available/000-default.conf
# DEFAULT
# DocumentRoot /var/www/html
# MY LOCATION
DocumentRoot /var/www
4. Some config syntax has changed.
Replace:
Order allow,deny
Allow from all
with
Require all granted
5. To test your config files in general once they’re placed into /conf-enabled, run
sudo apachectl configtest
If you encounter something like:
FastCgiIpcDir /var/lib/apache2/fastcgi: access for server (uid 1000, gid 1000) failed: write not allowed
you missed the sudo command.
6. If you use FastCGI & PHP5, you may need to correct one Directory line that used to work but no longer does:
<IfModule mod_fastcgi.c>
    AddHandler php5-fcgi .php
    Action php5-fcgi /php5-fcgi
    Alias /php5-fcgi /usr/lib/cgi-bin/php5-fcgi
    FastCgiExternalServer /usr/lib/cgi-bin/php5-fcgi -socket /var/run/php5-fpm.sock -pass-header Authorization
</IfModule>
<!--Directory /usr/lib/cgi-bin/php5-fcgi--><!--WRONG -->
<Directory /usr/lib/cgi-bin><!--RIGHT -->
    Options FollowSymLinks
    Require all granted
</Directory>
7. For general troubleshooting, look to the Apache (error & access) logs and any other application logs.
You can now “move” EIP’s from the ec2-classic to VPC’s. You just disassociate it from the instance, and then you will have an option to move it to “VPC Scope”. After that you can associate it to vpc instances 🙂
There is also a trick to migrating your /boot volume – it’s not quick and easy but it works – basically you have to mount a copy of your boot volume (anywhere but /boot) on a temporary new instance type and then chroot+reinstall the grub bootloader on it, and then detach it and use it as the boot volume on the new instance type
Good to know. Thanks for sharing!